Quantcast
Photoshop Tutorials! Learn how to do some cool mods! - Page 2 - Beyond.ca - Car Forums
Page 2 of 3 FirstFirst 1 2 3 LastLast
Results 21 to 40 of 51

Thread: Photoshop Tutorials! Learn how to do some cool mods!

  1. #21
    Join Date
    Sep 2004
    Location
    christchurch, new zealand
    My Ride
    1985 civic *bling*
    Posts
    377
    Rep Power
    20

    Default

    neon tutorial!


    step #1
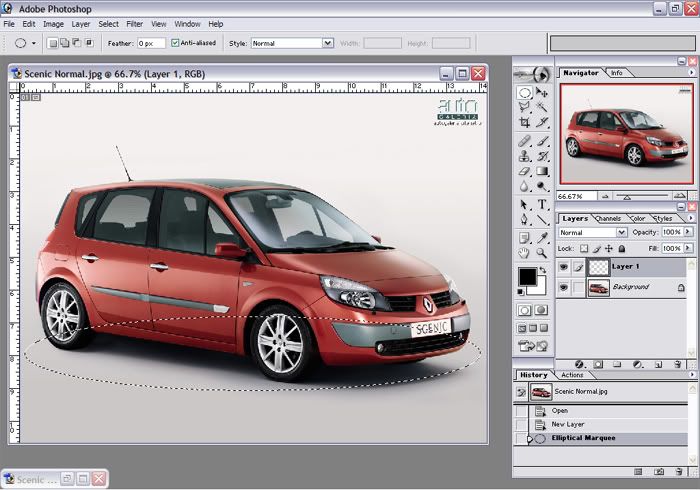
    we will start with this random audi thing
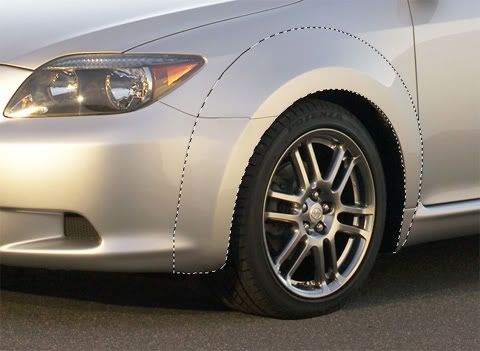

    step #2
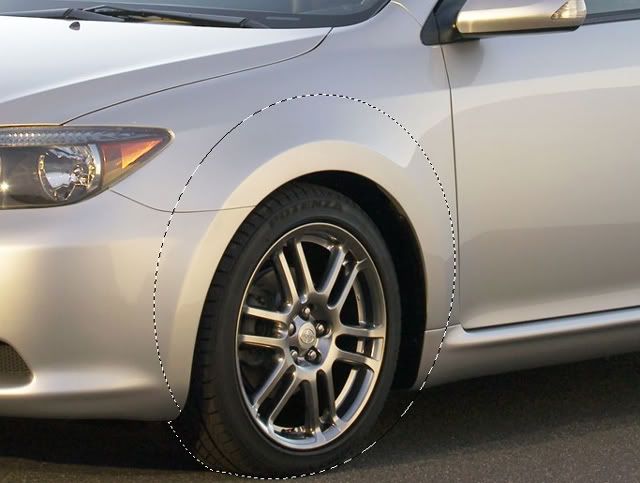
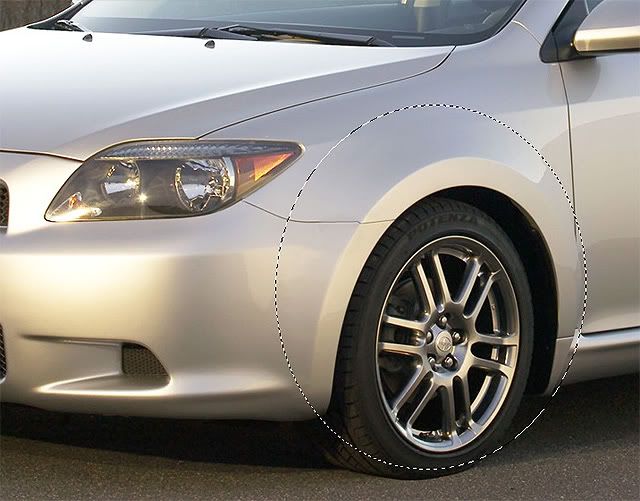
    select a realistic neon shape with the polyganal lassoo. the lasso can go over the car coz it has to look realistic you will delete the overlaying bits later


    step #3
    right-click on the selection and select feather, set it to about 12(depending on how big your neons are)


    step #4
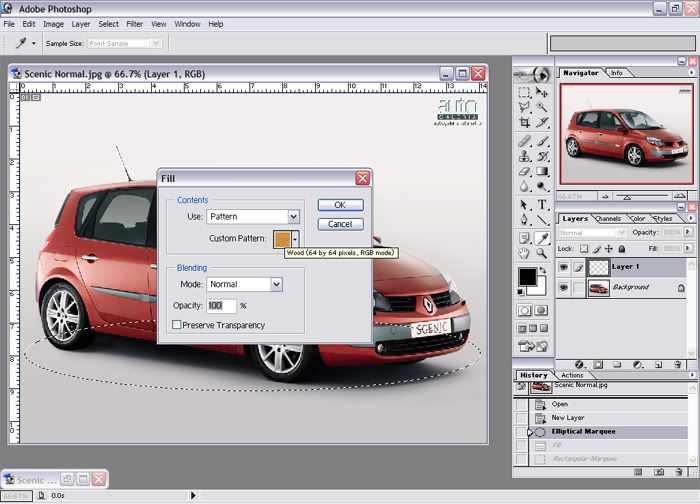
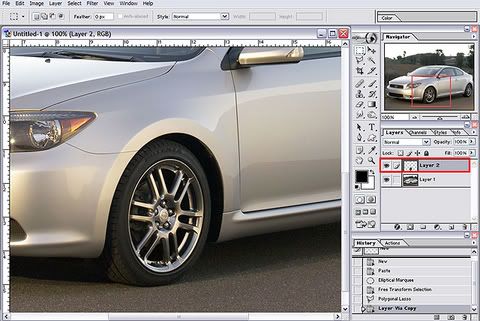
    create a new layer, call it colour or w/e you want-this will be the layer with colour*durr* :p
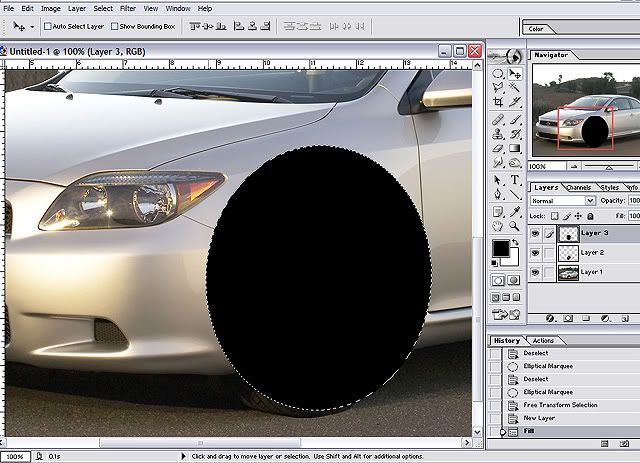

    step#5
    now pick a colour(dosnt matter if you dont like it, you can change it later) and paint in the colour in the selection. and do another selection and feather for the front too and colour that too.


    step #6
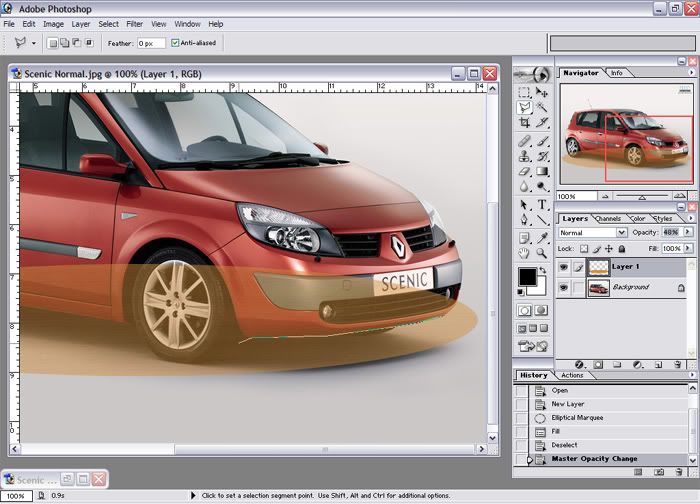
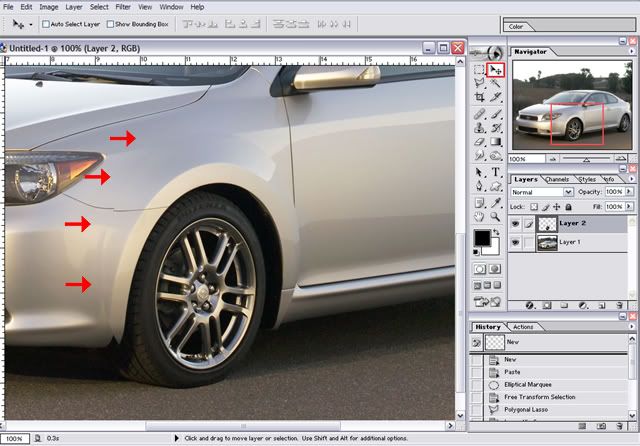
    change the layer mode to overlay-odds are it will dispear but its supposed to
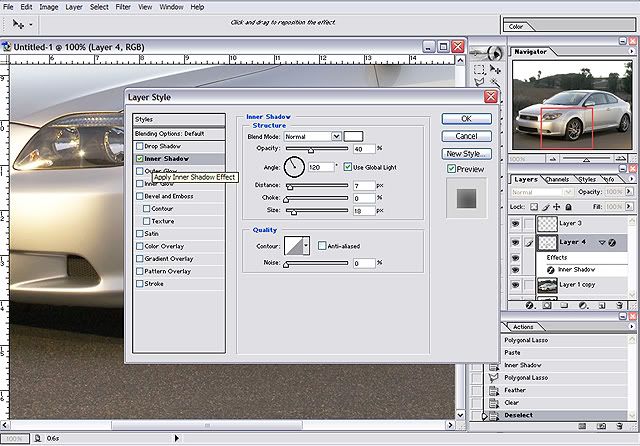

    step #7
    now create a new layer and name this glow. move this layer in between the ground and colour.


    step #8
    this will give a perfect selection of the glow.


    step #9
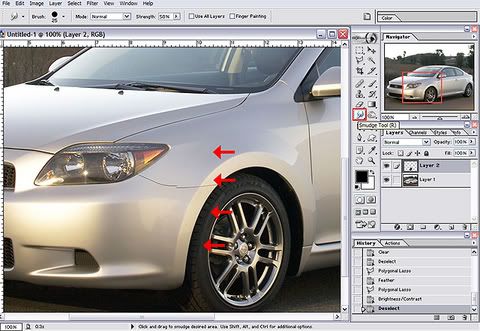
    now grab the stamp tool and hold alt and select a area of the light ground beside the neon and paint it in now the neon will light up.


    step #10
    do the same to the front. :p


    step #11
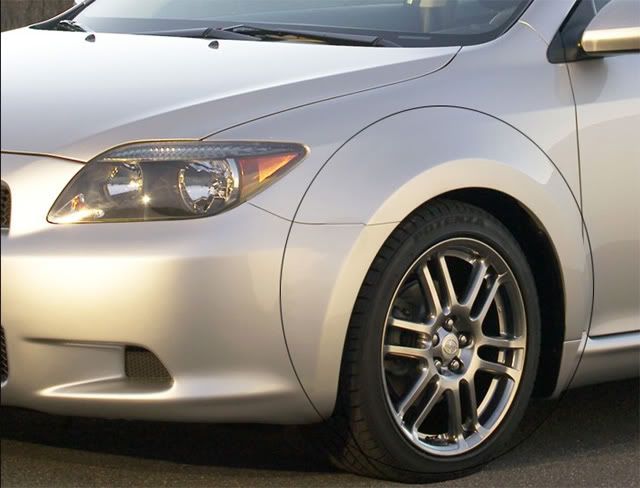
    now just select the part you dont want on each layer hit delete, switch layer and hit delete again and this is what you should have.


    step #12
    make a few adjustments (ctrl+u) on the 'colour' layer to make it look a bit more realistic.
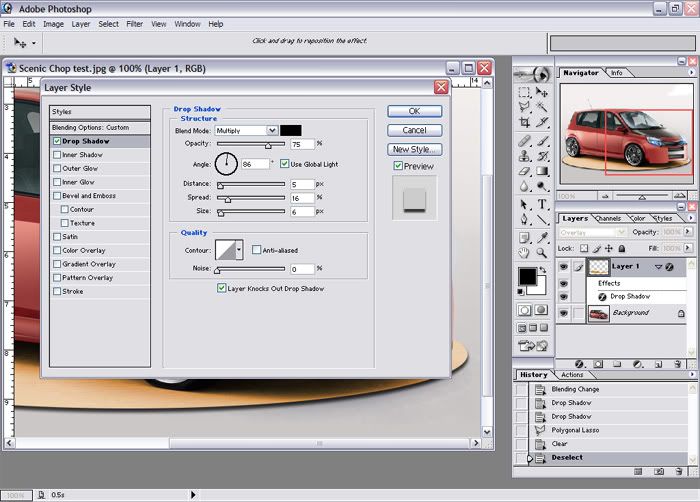
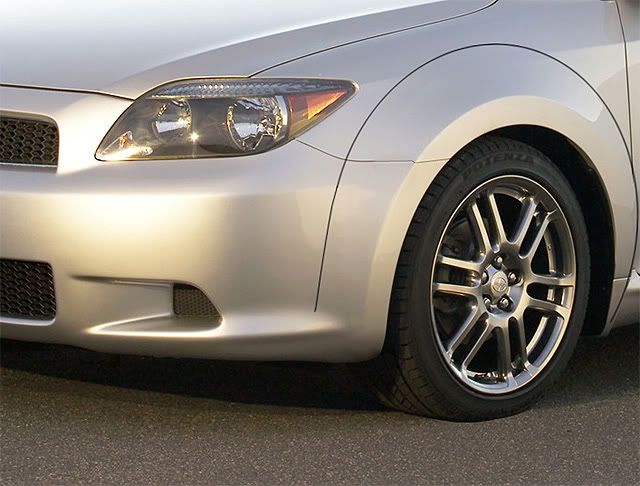

    final
    this is what you should have (or round abouts :p )


    -f_c

  2. #22
    Join Date
    Nov 2004
    Location
    IL
    Posts
    2
    Rep Power
    0

    Default

    You think one of you guys can add a tutorial on how to add spinners to a image?

    I want to add spinners to a 2000 Chevorlet Blazer Xtreme, but I havent quite figured it out


    I am new to this site/forums.

    Let me know if a tutorial can be posted. Thanks

  3. #23
    Join Date
    Nov 2004
    Location
    MA
    My Ride
    Infiniti
    Posts
    821
    Rep Power
    20

    Default

    dam, that cf tut was great, it just took my entire life to figure it out
    screenshots really helped though,

  4. #24
    Join Date
    Sep 2004
    Location
    christchurch, new zealand
    My Ride
    1985 civic *bling*
    Posts
    377
    Rep Power
    20

    Default

    How To Make Your OWN Intercoolers!!


    step #1
    create a new image (20x20 pixels)


    step #2
    zoom right in (1600%)


    step #3
    with the line tool create a pattern like this. or if you are lazy click here to download this pattern.


    step #4
    now to make it a pattern. to do this: edit>define pattern


    step #5
    name the pattern and then click 'ok'


    step #6
    now to create the actual intercooler. create a new image, i like to use these proportions.


    step #7
    edit>fill and fill with the pattern you just made (or copied lol)


    step #8
    it should look like this now:


    step #9
    now to make the end plates. create a new layer.


    step #10
    now select the rectangular select tool and select a small area on the end of the intercooler. then select the gradient tool with two different metalic-like colours and hold shift and drag the tool across the selected area.


    step #11
    now de-select (ctrl+d) and draw a single white line on the edge of the sideplate.


    step #12
    now duplicate the sideplate layer. do this by right clicking on the layer in the layers box and selecting the duplicate layer option.


    step #13
    edit>transform>flip horizontal.


    step #14
    now get the move tool and hold shift and then move the flipped sideplate across to the other side of the intercooler. you are now finished. just press ctrl+shift+E to merge it all down. fit it as you would a normal intercooler.


    -f_c

  5. #25
    Join Date
    Sep 2004
    Location
    christchurch, new zealand
    My Ride
    1985 civic *bling*
    Posts
    377
    Rep Power
    20

    Default bad boy bonnet

    How To Make A Bad Boy Bonnet (aka: boser hood)

    step #1
    lets start with this nice WRX


    step #2
    now select the area to make a bad boy with the polyognal lasoo tool


    step #3
    now smudge the bonnet onto the selected area like this :


    step #4
    now continue to smudge it down so it all fills up.


    step #4
    get the eyedropper tool and select a dark colour from around the light housing.


    step #5
    now select the line tool on 1px and draw in a line just like i have done.


    step #6
    now, if you want detal and best results do this: create a new layer


    step #7
    get the eyedropper tool and select a highlight colour


    step #8
    get the line tool with that colour you just selected and draw a line above the black line you drew earlyer


    step #9
    now get the eraser on about 30 opacity and go over the line a few times so it looks realistic


    step #10
    now merge the layers, and dont forget to do the other one lol


    finished

    -f_c

  6. #26
    Join Date
    Nov 2004
    Location
    Just on the apex of a right hander
    My Ride
    03' renault clio
    Posts
    6
    Rep Power
    0

    Default

    hey foto. This is definately the best, most efficient tut i have seen for some time. And the screenshots are a massive help. So keep up the good work by helpin us rookies!!

    I wondered if it would be possible for you to post a xenon light tut, cause i have bin choppin a s200, and mine, quite frankly, look like a large dollop of poo!!

    If you could do this is i will personally see you are made the king of Englandshire!!!

    Thanks again M8, your a gr8 help!!!

    Drift chopper

    (If anyone can help me please e-mail me. My addy is [email protected])

    Cheers
    1001 bhp still isnt enough bugatti!!!

  7. #27
    Join Date
    Sep 2004
    Location
    christchurch, new zealand
    My Ride
    1985 civic *bling*
    Posts
    377
    Rep Power
    20

    Default

    yeah, sure, ill do it later tomorrow.

    xenons are easy as pie. mmmmmmmmm pie

  8. #28
    Join Date
    Dec 2004
    Location
    Eugene/Or
    My Ride
    Infiniti G35C
    Posts
    14
    Rep Power
    0

    Default

    Can anyone with some skill help me with this project here, I need to make the bumper the same color as the car and I've already desaturated both of them, here is the chop
    Attached Images Attached Images  

  9. #29
    Join Date
    Sep 2004
    Location
    IL
    My Ride
    '94 Mazda 626 LX
    Posts
    45
    Rep Power
    0

    Default

    awesome tuts. Wats a good way to paint a car black??

  10. #30
    Join Date
    Sep 2004
    Location
    christchurch, new zealand
    My Ride
    1985 civic *bling*
    Posts
    377
    Rep Power
    20

    Default

    do the oppisite of the white tut add a bit of contrast tho, not too much or it will look fake

  11. #31
    Join Date
    Aug 2003
    Location
    southside edmonton
    My Ride
    2002 CiViC SiR
    Posts
    83
    Rep Power
    0

    Default

    man for some reason im to dumb to follow these steps, this is too confusing for me, ive been sitting here for 4 hours and havent gone anywhere. i cant even figure out how put diff rims on my car. i can add them the the picture, but i cant figure out how to move the wheel or rotate or make it seem to be on the car. HELP

  12. #32
    Join Date
    Feb 2004
    Location
    Germany
    Posts
    248
    Rep Power
    0

    Default

    ...not really a tutorial, but i think this little pdf-file
    is helpful if you can't find your "original" ps-manual anymore.


    http://seppel.250free.com/Shortcuts.pdf

  13. #33
    Join Date
    May 2004
    Location
    Azusa / CA
    My Ride
    95 4dr integra
    Posts
    69
    Rep Power
    0

    Default


  14. #34
    Join Date
    Jan 2005
    Location
    New York
    Posts
    90
    Rep Power
    0

    Default

    Originally posted by '02SiR
    man for some reason im to dumb to follow these steps, this is too confusing for me, ive been sitting here for 4 hours and havent gone anywhere. i cant even figure out how put diff rims on my car. i can add them the the picture, but i cant figure out how to move the wheel or rotate or make it seem to be on the car. HELP

    To fit rims go to edit > transform, and use things like distort and perspective to fit the rim. You'll need a relatively similar angle to the original pic to fit it though.

  15. #35
    Join Date
    Jan 2005
    Location
    New York
    Posts
    90
    Rep Power
    0

    Default

    My Simple Ground Neon Tutorial


    For this tutorial I will use this crappy Audi TT I did awhile ago.
    Note:To see full size pics, click the image, then hover the mouse over the image until a box appears in the bottom right corner. Click the box.

    Step 1
    Duplicate background layer.

    Step 2
    Select the area where you want the neon to be. Don't be afraid to go over the car, you can delete the excess later.

    Step 3
    Feather the selection about 8-15 pixels.

    Step 4
    Image>Adjustments>Brightness Contrast. Raise both brightness and contrast. (my settings were - brightness:75 contrast:55)


    Step 5
    Hit ctrl+u to bring up the hue/saturation box. Hit the colorize box on the bottom right, and adjust to your liking.

    Step 6
    The reason you worked on another layer is so you can delete any overhanging parts. Look near the side skirt of the car, or on the tires or rims. Highlight anything you want gone, then hit delete on your keyboard.

    Final Result


    --------------------

    Pics down, I'll try to get some new ones up.
    Last edited by HeLlHaWk23; 05-20-2005 at 03:27 PM.

  16. #36
    Join Date
    Mar 2005
    Location
    Calgary
    My Ride
    350z
    Posts
    317
    Rep Power
    20

    Default

    Wow! I learned something today. Great jobpimp.

  17. #37
    Join Date
    Jan 2005
    Location
    New York
    Posts
    90
    Rep Power
    0

    Default

    I just thought of this, and I'm rather pleased with the results. It's good to use an image with no real background. For this tutorial, we'll use this Renault Scenic.


    Note: I'll try to keep these images up, but I make no promises. If you feel that you really need them, feel free to save them to your computer.


    Step 1
    Make a new layer, and make a shape like this with the elliptical marquee tool.


    Step 2
    Go to Edit, then Fill. Set opacity to 100, and choose Wood (if you don't have it, try loading Pattern Fill or Pattern Fill 2.


    Step 3
    Lower the opacity of this layer so you can see the image below. Using the polygonal lasso tool, go around the car and select the excess material. Delete the excess material by hitting delete.


    Step 4
    Raise opacity again, then go to blending options. Add drop shadow. Change layer mode to Overlay.


    Complete
    Last edited by HeLlHaWk23; 07-22-2005 at 02:03 PM.

  18. #38
    Join Date
    Aug 2005
    Location
    England
    Posts
    105
    Rep Power
    0

    Default

    im pretty new to all this, is it the same in photoshop 5 or should i just get a newer version?

  19. #39
    Join Date
    Jan 2005
    Location
    New York
    Posts
    90
    Rep Power
    0

    Default

    How To Make Flared Fenders/Wider Arches

    For this tutorial we will use this Scion tC.


    Step 1
    Make a selection like this.

    click for larger version
    » Click image for larger version

    Step 2
    Layer via Copy (ctrl+J). This should make a new layer with your selection.

    click for larger version
    » Click image for larger version

    Step 3
    Using the move tool, nudge the layer over to the side a little.

    click for larger version
    » Click image for larger version

    Step 4
    Using the smudge tool, smudge the layer over to the side, until it looks right.

    click for larger version
    » Click image for larger version

    Step 5
    Make little corrections, like the line connecting the bumper.

    --------------------------------------

    The rest of this is optional, but I developed this technique and find it looks really good.

    Step 6
    On a new layer, make a selection like this using the eliptical marquee tool. If you can't get it right, go to select - transform selection.

    click for larger version
    » Click image for larger version

    Step 7
    On a new layer, fill the selection with black. Do not deselect.

    click for larger version
    » Click image for larger version

    Step 8
    Go to select - modify - contract. Contract by 1 pixel, then hit delete on your keyboard.

    click for larger version
    » Click image for larger version

    Step 9
    Delete the extra, and draw a line like I have done. Lower opacity to about 40%.

    click for larger version
    » Click image for larger version

    Step 10
    Merge the layer with the wide arch down into the background layer. Keep the layer with the line a seperate layer. Make a selection around the whole arch and layer via copy. (ctrl+j)

    click for larger version
    » Click image for larger version

    Step 11
    Right=click the image, go to blending options, and apply inner shadow matching these settings.

    click for larger version
    » Click image for larger version

    Complete. Use the same method for the rear arch. I'll be posting a chop of this car sometime in the near future. Here is an example of this tutorial in use.

    Last edited by HeLlHaWk23; 08-18-2005 at 08:55 AM.

  20. #40
    Join Date
    Sep 2005
    Location
    toronto
    My Ride
    a rusty old skate board
    Posts
    4
    Rep Power
    0

    Default

    Can some1 follow these instructions and upload photoshop for me. The people who have photoshop must 1st go and upload the whole photoshop software on a website like www.filefront.com or www.megaupload.com and then post the link here on SCF so the people who dont have photoshop can have it....smart or what
    Last edited by diablo_1; 09-03-2005 at 12:01 PM.

Page 2 of 3 FirstFirst 1 2 3 LastLast

Similar Threads

  1. Photoshop tutorials (text/font tutorials)

    By 2drtahoez71 in forum Photoshop Gallery
    Replies: 2
    Latest Threads: 06-09-2004, 02:19 PM
  2. photoshop tutorials?

    By 6thGen.TUNER in forum Photoshop Gallery
    Replies: 2
    Latest Threads: 04-12-2004, 03:15 PM
  3. tutorials ?! add some and get some :)

    By ww667 in forum Cosmetic and Styling Modifications
    Replies: 0
    Latest Threads: 04-03-2004, 10:48 AM

Posting Permissions

  • You may not post new threads
  • You may not post replies
  • You may not post attachments
  • You may not edit your posts
  •