Quantcast
My DIY roof rust repair - Beyond.ca - Car Forums
Results 1 to 14 of 14

Thread: My DIY roof rust repair

  1. #1
    Join Date
    Jul 2008
    Location
    Calgary
    My Ride
    2004 3.5, 2004 5.4, 1999 4.0
    Posts
    142
    Rep Power
    0

    Default My DIY roof rust repair

    So my windshield was in really rough shape, and I started to notice that the headliner was getting wet when I would wash the truck. I figured I would kill two birds with one stone and try my hands with some rust repair and replace the windshield at the same time.

    I forgot to take a picture before I started so there is a tiny bit of sanding started already in these pictures, just to give an idea of the rust I had.


    Once I sanded this down I could see a hole through that big rust spot.


    Next I just went at it with my air grinder and sanding discs, starting with 80 grit and then 120 grit. Really focusing on the bad rust spots trying to remove all of it.


    Got to the point where the windshield was getting in the way, and from what I saw online from other repairs is the rust was usually worse under the seal. SO took the windshield out to see what was dealing with. Luckily for me there was no rust holes, just pitting.


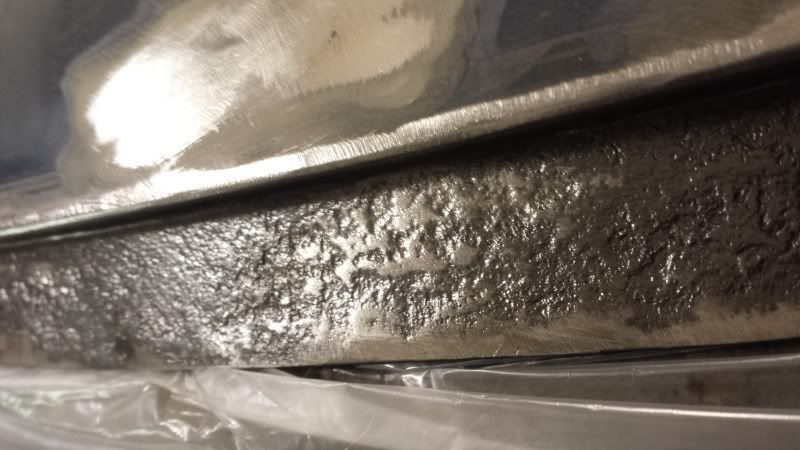
    When you get rid of most the rust and the only rust that is left is in the pits, I switched to a wire wheel, it took out the remainder of the rust and just leaves you with alot of pits.


    Last edited by Drooool; 02-08-2014 at 03:22 AM.

  2. #2
    Join Date
    Jul 2008
    Location
    Calgary
    My Ride
    2004 3.5, 2004 5.4, 1999 4.0
    Posts
    142
    Rep Power
    0

    Default

    Once I got rid of all the rust spots and removed all the rust out of the pits I just sprayed a couple coats of rust inhibitor to protect against future rusting.


    After I let that dry over night, I got to filling all my rust spots with 3m body filler. If you are going to tackle this on your own make sure you pick the right type of body filler for your application, they have a few different kinds. Mix it properly in little amounts, apply it quick and make sure its set properly.


    And remember the thinner you apply it the better, the less sanding you will need to do later.


    I let that dry over night, then got to sanding. I did all this sanding by hand so you don't sand too much. I started with a light 320 grit, then a 400 then 500. Just sand till it is all smooth. At the same time you need to feather edge all the bare metal spots from the metal to the primer to the paint to the clear. This will help your final to be nice and smooth.


    After your done your sanding, make sure you clean the area really really well. I used a wax covered tack cloth, grabs all the dust. Then mask off the area and spray a couple coats of primer, first layer should be thin.


    Followed by some wet sanding after the paint is dry. I used 1500 grit for this to take out any left over dust bits and imperfections. Will also take out any overspray.


    Now you get to the painting. I used the colour matching duplicolour paint, but some places can make any manufactures colours in a spray can. After you have good coverage of paint then you can give a couple layers of clear coat.


    Pre-clear


    After-clear


    I let that dry over a couple days then gave it a 3 stage power polish to blend and shine.


    Took it down to work and got a new windshield put into it. Washed it and used a clay bar to take out the remaining overspray.

    It has been about a month since I did this now so I will try remember to grab a couple pictures of how it has held up so far and the finished job.

    BTW I have no idea what I am doing, I learned all I could online and made up the rest (there's very limited resources for stuff like this I find, so hopefully this can help someone else out)... So if I offended anyone that does bodywork then I'm sorry lol.
    Last edited by Drooool; 02-08-2014 at 03:23 AM.

  3. #3
    Join Date
    Sep 2004
    Location
    calgary AB
    My Ride
    toyota MR2
    Posts
    2,082
    Rep Power
    22

    Default

    looks good thanks for posting!
    sig deleted by moderator, click here for info

  4. #4
    Join Date
    Jun 2002
    Location
    Calgary, AB
    Posts
    1,991
    Rep Power
    30

    Default

    I would never even attempt this but nice work and thanks for taking the time to share. Your pedo van looks less pedoish.

  5. #5
    Join Date
    Jul 2008
    Location
    Calgary
    My Ride
    2004 3.5, 2004 5.4, 1999 4.0
    Posts
    142
    Rep Power
    0

    Default

    my pedo van lol. this is my exploder!


    Last edited by Drooool; 02-08-2014 at 03:24 AM.

  6. #6
    Join Date
    Jul 2006
    Location
    NA
    Posts
    1,307
    Rep Power
    20

    Default

    .
    Last edited by Rat Fink; 12-02-2020 at 03:38 PM.
    Thanks for the 14 years of LOLs. Govern yourselves accordingly and avoid uppercut reactions!

  7. #7
    Join Date
    Jun 2002
    Location
    Calgary, AB
    Posts
    1,991
    Rep Power
    30

    Default

    My bad kind of looked like a van from the top view pics.

  8. #8
    Join Date
    Apr 2010
    Location
    .
    My Ride
    .
    Posts
    356
    Rep Power
    15

    Default

    Looks great! question, did you drive down to your work place to have the windshield put in? If so how was it like driving with out a windshield lol?
    .

  9. #9
    Join Date
    Oct 2006
    Location
    Parked in Baygirl's garage.
    My Ride
    '21 F150 PowerBoost
    Posts
    4,592
    Rep Power
    29

    Default

    Originally posted by roopi
    My bad kind of looked like a van from the top view pics.
    lol, that makes 2 of us. I thought it was a caravan.
    Boosted life tip #329
    Girlfriends cost money
    Turbos cost money
    Both make whining noises
    Make the smart choice.

    Originally posted by Mibz
    Always a fucking awful experience seeing spikers. Extra awful when he laps me.

  10. #10
    Join Date
    Jul 2008
    Location
    Calgary
    My Ride
    2004 3.5, 2004 5.4, 1999 4.0
    Posts
    142
    Rep Power
    0

    Default

    Originally posted by amear
    Looks great! question, did you drive down to your work place to have the windshield put in? If so how was it like driving with out a windshield lol?

    Yeah I drove it without. It was only about a 2 minute drive, and it was pretty chilly. I think it was around 0C.


    Here is how it sits now. Been about a month since I finished this and its held up so far!


    Last edited by Drooool; 02-08-2014 at 03:25 AM.

  11. #11
    Join Date
    Jun 2006
    Location
    Calgary
    Posts
    2,452
    Rep Power
    20

    Default

    Looks like it turned out well! But I'm pretty sure body filler in the pinch weld (windshield bonding) surface is a no-no.

  12. #12
    Join Date
    Mar 2005
    Location
    Calgary
    My Ride
    Starion / 2010 Camaro
    Posts
    279
    Rep Power
    20

    Default

    i would think the adheasive from the windshield will pull out all the bondo in the event of a rollover or even when replacing the windshield in the future. may not have been the safest/proper way to fix that part but the roof came out really nice from the pictures.
    good job.

  13. #13
    Join Date
    Jul 2003
    Location
    YYC
    My Ride
    Cup of Tea
    Posts
    1,970
    Rep Power
    26

    Default

    I hope you used an epoxy primer on those bare metal spots or you will be seeing rust again soon

  14. #14
    Join Date
    Jun 2006
    Location
    Calgary
    Posts
    2,452
    Rep Power
    20

    Default

    Originally posted by civicrider
    I hope you used an epoxy primer on those bare metal spots or you will be seeing rust again soon
    That's a good point. Couple options.

    Bare metal, epoxy, bondo, filler/surfacer primer, paint.

    or if no bondo needs to be used:

    Bare metal, etch primer or epoxy, filler/surfacer primer, paint.

    Use epoxy instead of etch when you can. Etch will work for smaller repairs, and saves time.

    In old days, it was bondo/body filler right over bare metal, and you can still do that. But the advancements in Epoxy primer now allow you to apply filler over it, and next to OEM E-Coat from the factory, Epoxy primer is the next best thing. So it's added protection from corrosion. Optional, but suggested. The downfall being it's typically a 2K product that requires mixing and a gun, which not everyone has the tools for.

    Etch primer can also be applied over bare metal for protection, but typically you cannot bondo over etch primer. It is however commonly available as a 1K product, so you can get a good Etch primer out of a spray can. If you don't have a gun to lay Epoxy, and you're doing a rattle job, then you do: bare metal, bondo, sand down the bondo, spot treat remaining bare metal with etch primer, filler/surfacer primer over the entire repair area, then paint.

Similar Threads

  1. Replacing shingle roof (DIY). General questions.

    By Seth1968 in forum Home and Garden
    Replies: 3
    Latest Threads: 03-05-2017, 07:28 PM
  2. small rust spot on roof

    By simonseys in forum Cosmetic and Styling Modifications
    Replies: 2
    Latest Threads: 05-03-2010, 08:56 PM
  3. FS: RUST! (free truck with rust)

    By Tik-Tok in forum Trucks, SUVs, Vans, Trailers
    Replies: 0
    Latest Threads: 03-17-2009, 04:50 PM
  4. Rust Removal DIY

    By Neil4Speed in forum Cosmetic and Styling Modifications
    Replies: 1
    Latest Threads: 07-16-2007, 03:37 PM
  5. Rust, Rust more Rust

    By fresh in forum Cosmetic and Styling Modifications
    Replies: 0
    Latest Threads: 03-17-2005, 07:22 PM

Posting Permissions

  • You may not post new threads
  • You may not post replies
  • You may not post attachments
  • You may not edit your posts
  •