Some recent light painting Photos (1972 C10 truck)
Got some original 15x7 rims and original hubcaps on, so time for some new photos.


For anyone interested, here are instructions for this photo technique that uses simple tools and lets you create photos you can't believe you actually took.
Video showing the steps, with trial and error: https://youtu.be/dJHV4IMHXuA
Setup

Equipment needed:
- Tripod. AmazonBasics has tripods for cheap, $30.
- Flashlight (good to have a few types to see what works)
- Camera with manual mode

Concept:
Cameras collect light. That's their job. When you take a photo in the daylight, the light from the sun bounces off the subject and into the camera lens. That's how the photo shows up later (digital or film). In the pitch dark, a photo will be black because there is no light for the camera to see and create the picture. So, in the dark you can provide the light via a flashlight! This offers you the control to dictate what the camera sees. Wherever you shine the light during the photo, that lit-area will appear in the photo. Why am I not visible in the photos? Because I never let the light touch me. As far as what the camera sees, I'm dark, so it does't register me as in the photo. Only what the light touches.
Camera Setting:
Your camera will need a manual mode. Why? Because this type of photography is all about controlling 2 major settings, and trial and error. It took 40+ attempts to get the final photos I liked, below. This means making large or small adjustments to the following settings: Aperture & shutter speed.
Aperture:
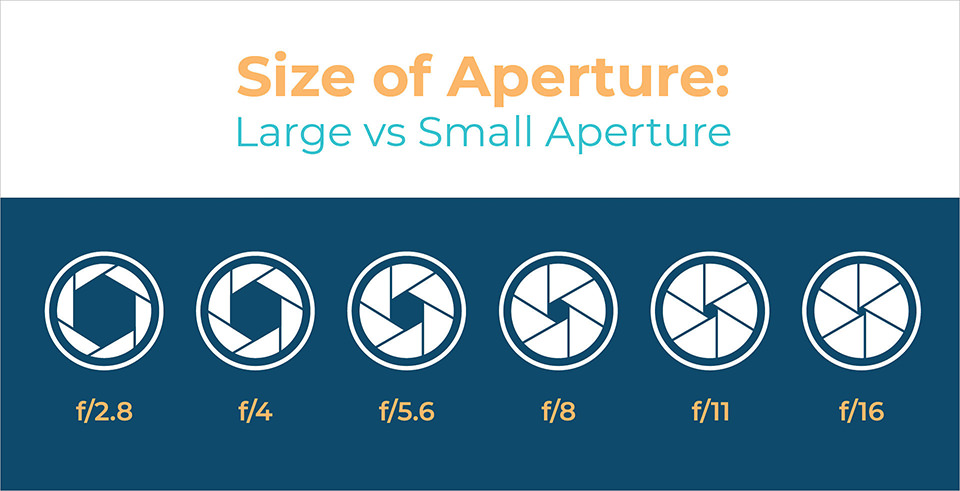
This is a ring within the lens that can open or close to let more or less light in. A photo will be brighter if the aperture is open, and darker if the aperture is closed. The term to describe the aperture setting is F-stop, and it describe in the units of F4, F8, F11, F18, etc. There's a big range of aperture values for each lens. The odd thing to remember is F4 is more open (more light) then F18. Check out the illustration below.
Shutter Speed:
Shutter speed means how long the camera is letting light in, during the photo. Typical photography uses fractions of a second to capture a still image (1/500th of a second). When there is a lot of light available (sunshine) a very short (brief) shutter speed (1/500th of sec) is required to allow the light to build up and create the image. When there is less light available (indoors), more time is required for the available light to build up in the camera to create the photo (1/5th of a second). Shutter speed or "exposure time" can be thought about like leaving a piece of tan leather out in the sun. The longer you leave it there, the more bleached it's going to become. This 'brightness' of the leather in the sun is related to a) how long the sun hits the leather, and b) how intense the sun is. The same is true for the brightness of the photo building up.
In the case of light painting photography, I typically use a 30 second exposure. That's right 30 entire seconds of light entering the camera. This is why I put it on Manual mode, so I can set the shutter speed to 30 seconds. My aperture is typically F9 or F16, depending on the power of my flashlight. It'll take trial and error to figure out what aperture you'll need for the photo to be bright enough vs too bright.
Why do I want 30 seconds of shutter speed? Mainly to give myself time. Time to grab my flashlight, run over to the truck, and have time to 'paint' light on the truck for a 30 second period.
This brings the tripod into the picture. Have you tried taking a photo inside, with poor light and no flash? If you're holding the cameara, guess what? You're moving. In auto mode, the camera senses it's dark, so to compensate it a) opens the aperture up, and b) tries to apply a long shutter speed to collect the little light that's available (1/5th of a sec sometimes). During this 1/5th of a second, you are MOVING, even a little. This causes a blurry photo. This is why in auto mode, the flash will typically try to add light to the scene to the goal of getting a brief shutter speed to avoid a blurry photo.
The tripod fixes this 'movement' problem that creates blurryness. During the 30 second exposure, the camera is totally still. And since the truck is totally still, there is no blurryness.
Other tips:
- ISO - I'm not going to get into ISO here, but I recommend a low ISO setting as long exposure in digital cameras can create noise in the photo, so a low ISO can help combat this. I personally used ISO 200 in all the photos here and it worked out.
- Focusing - In the dark, it's hard for the camera to see the truck and auto focus on it. It just keeps hunting. I kept my tripod in the same spot for ~20 pictures, meaning my focal distance to the truck didn't change. My process was: 1) put the camera in auto focus mode, 2) point the flashlight at the truck so the camera can see the truck, 3) push the shutter release button 1/2 way down which enables auto focus (on every camera, trust me) and lock on to the truck, 4) disable auto focus. Step 3 sets the focal distance correctly. When I set it to manual focus in step 4, it means when I start the picture, the camera won't be hunting in the dark to try and auto focus before taking photo.
- Timer - Remember above where I said movement during the exposure can cause a blurry photo? When you use your finger to hit the shutter release button to start the photo, you touching the camera introduces movement! To get around this, set a 10 second timer on the camera. This way, 1) you allow 10 seconds for the camera to stop moving after touching it and 2) you have more time to run over to the truck with your flashlight.
- White balance - If the color in your photos looks really yellow or really blue, it means the white balance is off. The AWB (auto white balance) can often work ok, but if not, there are some pre-set white balance settings that can also work. Most LED flashlight have a white/blue tone, so I found the pre-set white balance of 'fluorescent' or 'flash' help match the LED color tone, providing a natural color from the photo.
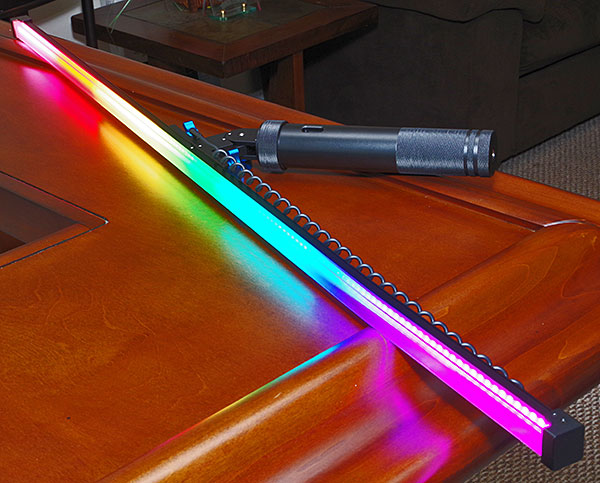
- Light streaks - It's important to not point the flash light AT the camera during the photo. This can cause some interesting effects (see below), but typically you don't want these streaks. So, when shining the flashlight, be conscious of where it's pointing.

Good luck! If anyone else has had success with this method, let's see your results.
Current Cars:
2019 BMW X3 M40i Stage 2, 12.44 at 110mph
1972 Chevy Super Cheyenne C10 Pickup 402 big block, 700R4
2004 GMC 2500HD 8.1L
Past Cars:
1970 Chevy Blazer, 2wd
2003 BMW X5 4.6IS Doushmobile, moneypit
2015 Ford Fiesta ST | Cobb Stage 1, catless downpipe
2008 Corvette Z06 - 11.39 at 123.8mph
2002 Corvette Z06 - 12.10 at 116.5mph
2005 Jeep Wrangler LJ
1993 5L Mustang - 12.59 at 108mph
1989 5L Mustang
1990 Jeep Cherokee
1991 Acura Integra RS 403Honda


 Quote
Quote